Toughness in Metals
Explore the fundamentals of toughness in metals with this technical guide, covering critical material factors, modes of failure, measuring methods, and strategies for choosing the right metal for tough applications.
Toughness is one of the most critical mechanical properties engineers must consider when designing components for real-world applications. It represents a material’s ability to absorb energy and plastically deform without fracturing — a combination of strength and ductility.
In CNC machining, toughness influences not only how a material behaves under stress but also how it performs during cutting, forming, and in-service loading.
In this article, we’ll review toughness as a mechanical property, how it’s measured, its impact on CNC machining operations, and how to pick the right metal for your machined component when material toughness is a key consideration.
What is Toughness and Why it Matters
Toughness describes a material’s ability to absorb energy and plastically deform before fracturing.
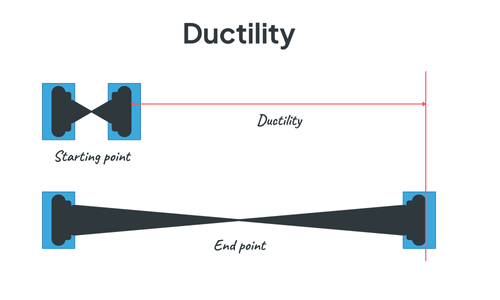
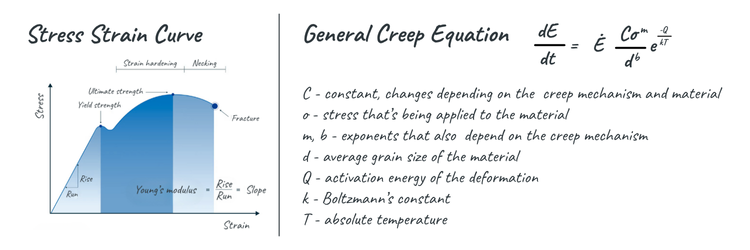
Unlike strength, which measures a material’s resistance to deformation, or ductility, which measures how much a material can stretch without breaking, toughness is a combination of both. It reflects how much energy a material can take — through impact, stress, or deformation — before it ultimately fails.
In practical terms, a tough metal won’t just resist breaking under load; it will also deform in a controlled way, giving engineers and operators time to detect and respond to failure before it becomes catastrophic.
This property is especially critical in applications where components are exposed to dynamic or unpredictable loading conditions. For example, in aerospace, automotive, and heavy industrial equipment, parts often experience sudden impacts, vibrations, or cyclic stresses. A tough material can withstand these conditions without cracking or shattering, making it essential for safety-critical components like landing gear, suspension arms, or pressure vessels.
Factors that Affect Toughness
Several factors affect a metal’s toughness, including composition, heat treatment, grain size, and work hardening.
Composition
A metal's alloying elements play a critical role in determining toughness and how it will behave under stress. For example, adding carbon to steel increases hardness and strength but can reduce toughness if not balanced properly. Elements like nickel and molybdenum are often added to improve toughness, especially in low-temperature environments.
The presence of impurities such as sulfur or phosphorus, however, can lead to embrittlement, particularly along grain boundaries, which compromises toughness. Engineers must carefully consider alloy selection based on the intended service conditions and the required balance between strength and ductility.
Heat Treatment
Heat treating processes like annealing can increase toughness by relieving internal stresses and promoting a more uniform microstructure. Quenching and tempering, commonly used in steels, can tailor the balance between hardness and toughness — with higher tempering temperatures generally improving toughness.
Improper heat treatment, however, can lead to the formation of brittle phases or residual stresses that reduce toughness. Engineers must specify heat treatment parameters carefully, especially for parts that will experience impact or cyclic loading.
Grain Size
Grain size is another major factor. Fine grains generally enhance toughness because they provide more grain boundaries, which help to impede crack propagation. This is described by the Hall-Petch relationship, where smaller grains increase yield strength and, in many cases, toughness.
However, excessively fine grains can sometimes reduce ductility, which may negatively impact toughness. Coarse grains, while potentially improving ductility, can reduce strength and make the material more susceptible to crack initiation. Controlling grain size through thermo-mechanical processing is a key strategy in optimizing toughness for CNC-machined components.
Work Hardening
Work hardening occurs when a metal is plastically deformed, increasing its dislocation density and internal stress. While this can enhance strength, it often reduces ductility and, by extension, toughness.
In CNC machining, operations like bending, forming, or aggressive cutting can induce localized work hardening, making the material more brittle in those regions. Post-machining treatments such as stress relief annealing can help restore toughness and prevent premature failure in service.
Modes of Failure in Tough Metals
Even though tough metals are engineered to absorb energy and resist fracture, they are not immune to failure. Toughness provides a margin of safety by allowing materials to deform plastically before breaking, but under certain conditions — such as excessive loading, cyclic stress, or elevated temperatures — even the toughest metals can fail.
Ductile Failure
Metals that are categorized as tough typically fail through ductile fracture, which is a gradual and energy-absorbing process.
Unlike brittle materials that fracture suddenly with little warning, tough metals undergo significant plastic deformation before breaking. This deformation often manifests as necking — a localized reduction in cross-sectional area — followed by the formation of microvoids that coalesce into a crack.

The fracture surface of a ductile failure is usually fibrous and dimpled, indicating that the material absorbed a substantial amount of energy before failure.
Fatigue
In cyclic loading environments, tough metals can also fail due to fatigue, especially if stress concentrations, surface defects, or microstructural inconsistencies are present.
Fatigue failure in tough metals typically initiates at a microscopic level and progresses slowly over time, often without visible signs until the final fracture occurs.

While toughness helps delay the onset of fatigue failure, it does not eliminate the risk — especially in components subjected to repeated stress or vibration.
Creep Failure
Additionally, tough metals may experience creep failure when exposed to high temperatures and constant stress over long periods. Creep is a time-dependent deformation that can eventually lead to rupture, even in materials that are otherwise resistant to impact or fracture.

In these cases, toughness helps the material resist crack propagation, but long-term exposure to stress and heat can still compromise structural integrity.
How Toughness is Measured
Toughness is measured by evaluating how much energy a metal can absorb before it fractures. This property is critical for understanding how a given alloy will perform under impact, shock, or stress concentrations.
Unlike hardness or tensile strength, toughness is not a single-value property — it reflects a combination of strength and ductility, and is often assessed through dynamic testing methods that simulate real-world loading conditions, including the Charpy impact test, the Izod impact test, and fracture toughness testing.
Charpy Impact Test
The Charpy impact test is one of the most widely used methods for assessing toughness. In this test, a notched metal specimen is placed horizontally and struck by a pendulum hammer. The energy absorbed in breaking the specimen is measured and used as an indicator of toughness.
Charpy tests are especially useful for comparing materials and evaluating how toughness changes with temperature, which is critical for applications in cold environments.
Izod Impact Test
The Izod impact test is similar to the Charpy test but differs in specimen orientation and setup. In the Izod test, the specimen is mounted vertically and struck on the upper end. This method is commonly used in plastics and metals testing and provides valuable data on how materials behave under sudden impact.
Engineers use Izod results to assess whether a material can handle dynamic loads without cracking or breaking, especially in components with notches or stress risers.

Fracture Toughness Testing
Fracture toughness testing, often performed according to ASTM standards like E399, goes beyond simple impact resistance. It evaluates a material’s ability to resist crack growth under stress, which is essential for components that may develop flaws during manufacturing or service. This test involves introducing a fatigue crack into a specimen and then loading it until failure.
The resulting data helps engineers understand how a material will perform over time, especially in high-pressure or fatigue-prone environments.
Hardness in Commonly Machined Metals
Toughness varies widely across commonly CNC-machined metals, and understanding these differences is essential for selecting the right material for a given application.
Toughness influences how a metal responds to impact, stress concentrations, and cyclic loading — all of which are critical in high-performance environments like aerospace, medical devices, and industrial machinery.
|
Metal |
Relative Toughness |
Machining Considerations |
|
Tool Steel |
Very low |
High hardness, low toughness; prone to brittle fracture; requires slow speeds and rigid setups. |
|
Aluminum |
Low to moderate |
Balanced toughness and machinability; suitable for structural parts with moderate stress. |
|
Titanium |
High |
Excellent toughness; challenging to machine; requires sharp tools, low speeds, and high cooling. |
|
Stainless Steel |
High |
Tough and corrosion-resistant; work hardens during machining; use sharp tools and controlled feeds. |
|
Bronze |
High |
Tough and wear-resistant; good machinability; ideal for bushings and bearings. |
|
Brass |
Very high |
Highly ductile and tough; easy to machine; excellent for fittings and aesthetic components. |
|
Copper |
Vey high |
Extremely tough and ductile; soft material can smear during machining; requires sharp tools and light cuts. |
How Toughness Impacts Machining
When designing machined components, it’s easy to focus on strength, hardness, or corrosion resistance — but overlooking toughness can lead to costly manufacturing challenges and compromised part performance.
Toughness not only influences how a metal responds to cutting forces, heat, and stress during machining, it also affects tool life, surface finish, and dimensional accuracy. Here are some machining factors to consider when working with highly tough metals.
Tool Wear
Toughness directly influences how a metal behaves under cutting forces, tool engagement, and thermal stress during machining. Tough metals resist fracture and absorb energy, which is beneficial for in-service performance but presents challenges during manufacturing. These materials tend to deform rather than shear cleanly, which can lead to poor chip formation, increased heat generation, and accelerated tool wear.
Engineers must account for this by selecting appropriate tooling — typically harder, wear-resistant materials like carbide — and optimizing cutting parameters to reduce stress on both the tool and the workpiece.
Surface Finish
Surface finish is another area impacted by toughness. Because tough metals resist cutting, they can produce irregular surfaces if not machined with precision. Built-up edge (BUE) is a common issue, where material adheres to the cutting tool and disrupts the finish.
To mitigate this, engineers should use sharp tools, apply proper lubrication or coolant, and consider multi-pass finishing strategies. Additionally, tough materials may deflect under tool pressure, especially in thin-walled sections, so part geometry and fixturing must be designed to maintain dimensional accuracy.
Machinability
While tough metals offer excellent performance in service, they require more careful planning during machining. Engineers should anticipate longer cycle times, higher tool costs, and the need for post-machining treatments like stress relief or surface conditioning.
When engineers understand how toughness influences every step of machining, they can set precise tolerances, choose optimal tool paths, and select the right materials to achieve components that are both easy to manufacture and built for lasting reliability.
By understanding how toughness impacts machining operations, engineers can make smarter decisions about material selection, tooling strategies, and part geometry — ultimately improving manufacturability and ensuring the component performs reliably in service.
Choosing the Right Metal for Tough Applications
Choosing the right tough metal begins with understanding the functional demands of the component. Engineers should start by identifying the types of loads the part will experience — whether impact, vibration, cyclic stress, or thermal fluctuation.
Toughness is especially critical in applications where failure could be sudden or catastrophic, such as aerospace brackets, medical implants, or industrial tooling. If the part must absorb energy without fracturing, resist crack propagation, or perform reliably under dynamic conditions, then toughness should be prioritized over properties like hardness or tensile strength alone.
Once the performance requirements are clear, engineers should evaluate material families that offer the appropriate toughness profile. Stainless steels, titanium alloys, and certain bronzes are known for their high toughness and are suitable for components exposed to harsh environments or repeated stress. However, these materials often come with machining challenges — increased tool wear, heat generation, and longer cycle times.
Engineers must weigh these trade-offs and consider whether the added toughness justifies the machining complexity. Collaborating early with machinists or manufacturing engineers can help identify tooling strategies, cutting parameters, and fixture designs that accommodate tough materials without compromising productivity.
Finally, be sure to factor in post-machining operations and lifecycle performance. Tough metals may require stress-relief treatments, surface conditioning, or specialized inspection methods to ensure long-term reliability. If the part will be welded, bent, or assembled under load, toughness becomes even more important. Engineers should also consider how toughness interacts with other properties like corrosion resistance, weight, and cost. By integrating toughness into the material selection process — alongside manufacturability and service conditions — engineers can design components that are not only durable and safe but also efficient to produce.
From a design and manufacturing perspective, understanding toughness helps engineers make informed decisions about material selection, geometry, and processing. A material with high toughness may be more difficult to machine due to its resistance to cutting and deformation, but it will offer superior performance in service.
Conversely, a material with low toughness might be easier to machine but could be vulnerable to brittle failure if not properly supported by design features like fillets, radii, or stress-relief treatments. Balancing toughness with other properties — such as hardness, strength, and machinability — is key to producing components that are both manufacturable and reliable in the field.

Let's connect
Want to learn more about our CNC machining services? Schedule a time to speak with our team.
